Thursday, November 10, 2011

Amoeba Woodworks, Featuring Marquetry Woodworking by Maryland Artist Amy Beaven

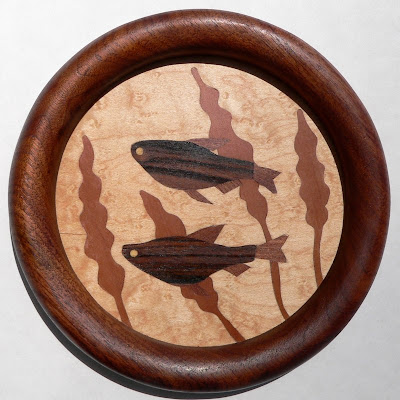
My sister in law, Amy Beaven, is a talented artist who has been woodworking since 2002. She designs her own patterns and uses the natural colors of the wood to create detailed works of art using marquetry techniques. She is also a marine biologist, working for the University of Maryland, and many of her designs are of sea life.

She will be doing a show this weekend at Unique Boutique in Hollywood Maryland and will also be at shows this fall in Columbia, Deale, and Greenbelt Maryland.


Here are some examples of her work:


Porthole Series


Framed Wall Art


Wooden Boxes


Jewelry


Business Card Holders

You can see more example's of Amy's art at her website Amoeba Woodworks.

Wednesday, October 12, 2011

Bacteriophage Virus Featured in Guru Magazine


Guru Magazine is a brand new free crowd-sourced digital magazine combining science with art, opinion, entertainment and lifestyle. Started by Dr. Stuart Farrimond out of frustration when he couldn't find any magazines he wanted to read, Guru Magazine seeks to provide high quality content accessible to everyone. New issues are released every other month, and are written by talented people from all over the world.

Issue 2 was released about two weeks ago and features an article on science based knit and crochet written by Michele Banks.She saw my crochet bacteriophage virus on Etsy and contacted me about including it in her article. Her article explores the relationship between science and needlecraft and what inspired the artists to create scientific based works of art.

So why did I crochet a bacteriophage virus? My degree is in Agricultural Engineering, and I've always had a love for science and nature. I also had a father who loved microscopy and looking at pond water critters. My grandmother taught me to crochet when I was about 10 or 11 years old and I especially loved to crochet stuffed animals - long before the hugely popular Japanese amigurumi craze swept the nation.

About a year and a half ago, I ventured into creating my own patterns because I wanted to be able to sell finished items, and many designers strictly forbid commercial use of their patterns. At the same time, Instrucatables, along with Lion Brand yarn, sponsored a yarn Critter Contest, which provided the motivation to finish some of my patterns. I try to create patterns that no one else has thought to make, and bacteriophages had a cute, cool shape that lent itself well to crochet.


The "head" of the virus is an icosahedron, a solid geometrical shape made up of triangles, so I started with a paper pattern and then crocheted 20 triangles, 10 each of two different sizes. I first tried whip stitching the triangles together, but didn't feel that gave the shape enough definition, so I went back and crocheted the pieces together. The "body" was a circular cylinder and the base plate was hexagonal. Hexagons are easy to crochet - six increases in each round are placed in the same location, instead of staggered. Because the "head" is so much larger than the "body", I added a piece of PVC pipe to provide support. I crocheted the tail fibers as long rectangles, instead of in the round, so that I could more easily add  upholstery foam and wire to support the weight of the virus.

An abbreviated overview of how to make the virus can be found on the Instructables website here. The detailed pattern is available in my Etsy store and on Ravelry. My first attempt at the pattern is currently residing at my husband's office, where it receives a lot of "what is it" queries. The second version, the one in the photos above, is at Harvey Mudd College, living in my son's dorm room.

I want to thank Michele for featuring my crochet virus and writing an excellent article about scientific needlecrafting. Be sure to check out her article and the rest of Guru Magazine.

Wednesday, September 28, 2011

Another free Halloween amigurumi pattern


This black cat is based on the same pattern as the ghost. I added a couple of rounds to the body to make him a little taller and added ears and a tail. You can make him with or without the arms. The arms are attached with dental floss so that they are movable. You can get an adobe pdf of the cat pattern here from Ravely.


 Here's the version with arms:


Monday, September 19, 2011

Halloween Ghost Free Amigurumi Pattern


Here's a fairly simple original ghost amigurumi pattern to make for Halloween. The ghost is made from worsted weight yarn and is about 4inches tall. The arms are a little tricky since they have multiple increases and decreases. If you prefer, a pdf of the pattern is available on Ravely here.


Supplies:
size F crochet hook
small amount white worsted weight yarn
scrap amount black DMC perle cotton size 5 for features
polyester fiberfill stuffing
3” square or circle plastic canvas
yarn needle

Abbreviations
Rnd: round
ch: chain
st: stitch
sc: single crochet
sl st: slip stitch
sc dec: single crochet decrease (sometimes denoted as sc2tog). Insert hook in next sc. Bring up a loop. Insert hook in next sc. Bring up another loop. Yarn over hook and bring through all loops on hook. Alternately, substitute an invisible decrease (invdec) if desired.

Numbers enclosed in parentheses indicate the number of stitches at the end of the round or row.

Directions enclosed in * * indicate instructions which are to be worked the specified number of times.

Note: This pattern is worked in a continuous spiral. Please mark the end of each round with a paper clip or contrasting colored thread. Do not join each round with a slip stitch.

Head and Body, Starting at Head:
using white yarn

Rnd 1:                  ch 2, work 6 sc in second ch from hook                              (6 sc)
                  Alternately, substitute a magic ring with 6 sc.
Rnd 2:                  starting in the 1st sc of Rnd 1, *2 sc in next st* 6 times    (12 sc)
Rnd 3:                  sc in each st around                                                            (12 sc)
Rnd 4:                  *2 sc in next st, sc in next st*  6 times                               (18 sc)
Rnd 5:                  *sc in next 2 st, 2 sc in next st*  6 times                            (24 sc)
Rnd 6 - 9:             sc in each st around                                                            (24 sc)
Rnd 10:                *sc dec, sc in next 2 st*  6 times                                        (18 sc)
Rnd 11:                sc in each st around                                                            (18 sc)
Rnd 12:                *sc in next st, sc dec*  6 times                                           (12 sc)
Rnd 13:                *2 sc in next st, sc  in next st*  6 times                              (18 sc)
Rnd 14:                *sc in next 2 st, 2 sc in next st*   6 times                           (24 sc)
Rnd 15:                *2 sc in next st, sc in next 7 st*  3 times                            (27 sc)
Rnd 16:                sc in each st around                                                            (27 sc)
Rnd 17:                sc in next 4 st, *2 sc in next st, sc in next 8 st*  2 times, 2 sc in next st, sc in next 4 st                                                                         (30 sc)
Rnd 18-19:           sc in each st around                                                           (30 sc)
Rnd 20:                sc in next 7 st, *2 sc in next st, sc in next 9 st*  2 times, 2 sc in next st, sc in next 2 st                                                                         (33 sc)
Rnd 21-22:           sc in each st around                                                           (33 sc)
Rnd 23:                *2 sc in next st, sc in next 10 st*  3 times                         (36 sc)
Rnd 24-25:           sc in each st around                                                           (36 sc)
Rnd 26:                sc in next 5 st, *2 sc in next st, sc in next 11 st*  2 times, 2 sc in next st, sc in next 6 st                                                                         (39 sc)
Rnd 27-28:           sc in each st around                                                           (39 sc)
Fasten off.

Base:
using white yarn

Rnd 1:                  ch 2, work 6 sc in second ch from hook                                (6 sc)
                  Alternately, substitute a magic ring with 6 sc.
Rnd 2:                  starting in the 1st sc of Rnd 1, *2 sc in next st* 6 times      (12 sc)
Rnd 3:                  *2 sc in next st, sc in next st*  6 times                                 (18 sc)
Rnd 4:                  *sc in next 2 st, 2 sc in next st*   6 times                             (24 sc)
Rnd 5:                  *2 sc in next st, sc in next 3 st*  6 times                              (30 sc)
Rnd 6:                  sc in next 3 st, *2 sc in next st, sc in next 4 st*  5 times, 2 sc in next st, sc in next st                                                                               (36 sc)
Rnd 7:                  *2 sc in next st, sc in next 11 st*  3 times                             (39 sc)

Fasten off leaving enough yarn to sew base onto body. Cut a circle out of the plastic canvas slightly smaller than the base. Stuff head and body. Place plastic canvas circle on wrong side of base. Sew base onto body with plastic canvas and wrong side on the inside of ghost.

Arms (make 2):
using white yarn

Rnd 1:                  ch 2, work 4 sc in second ch from hook                               (4 sc)
                  Alternately, substitute a magic ring with 4 sc.
Rnd 2:                  sc in each st around                                                              (4 sc)
Rnd 3:                  *2 sc in next st, sc in next st*  2 times                                 (6 sc)
Rnd 4:                  sc in each st around                                                              (6 sc)
Rnd 5:                  2 sc in each of next 2 st, sc in next 4 st                                (8 sc)
Rnd 6:                  sc in next st, 2 sc in each of next 2 st, sc in next st, 2 sc dec                                                                                                                                         (8 sc)
Rnd 7:                  sc in next 2 st, 2 sc in next st, sc in next 3 st, sc dec           (8 sc)
Rnd 8:                  sc in next 4 st, 2 sc in next st, sc in next 3 st                      (9 sc)
Rnd 9:                  sc in next 4 st, 2 sc in next st, sc in next 4 st                    (10 sc)
Rnd 10:                2 sc in each of next 2 st, sc in next 2 st, 2 sc dec, sc in next 2 st                                                                                              (10 sc)
Rnd 11:                sc in next st, 2 sc in next st, sc in next 3 st, sc dec, sc in next 3 st                                                                                           (10 sc)

Fasten off leaving enough yarn to sew arm onto body. Stuff arms. Refer to photo to place and shape arms.

Embroider features as desired.      


Like this pattern? Make sure to follow this blog or like my Facebook fan page to be the first to find out when new patterns are available.

Tuesday, August 9, 2011

Everything I've Learned (So Far) About Making Key Chains

If you scroll saw, you really need to check out Steve Good's Scrollsaw Workshop. He has an awesome collection of patterns, video tutorials, product reviews and a great community forum. Pretty much everything you need to get started or improve your skills is on the website. One of the first projects I made from his pattern collection was the oval key chains. I also make the southwest arrow key chains.


I started making the oval key chains last year for the Kansas City Teddy Bear Jubilee show my sister attends, so I was interested in expanding beyond the patterns Steve had supplied to other topics and designs. Since I am not an artist, I first needed to find images to use. One of my favorite image sites is Open Clip Art. These images are public domain, so they can be used on items for sale. I use Inkscape to transform the images from solid silhouettes to outlines when needed and Microsoft Publisher to fit them into the oval or arrowhead shapes. I also get images from other scroll saw patterns and adjust them as needed to make the key chains. For example, I wanted more dog breeds, so I copied the images from the Christmas tree ornaments and resized them for the key chains:


My favorite wood for the front of the key chains is 1/8" thick maple. The grain pattern is light enough to show off the image and intricate details can be cut without breaking or chipping. I stack 2 or 3 layers together and secure with masking tape. I put the patterns on the top of the stack and drill blade entry holes. Even drilling into a wood backer can leave rough drill exit holes, so I sand the back before sawing to keep from dragging on or scratching the saw table.


I cut the interior design using a 2/0 blade. I do not cut or drill the hole where the key chain hardware is attached. Since I use mostly scrap wood for the back, I next rough cut around each key chain leaving about 1/8" of waste material. If I have a large enough piece of backer material, I sometimes omit this step. 


The top layer of the stack still has the pattern, but the lower layers do not. I use a template cut from 1/8" clear acrylic to draw the key chain outside edge on the lower layers of the stack.


I then glue the key chain fronts to the backing wood. If I plan to use clear epoxy to fill the image, I choose a highly contrasting wood to use for the back such as cherry, walnut, mahogany, bubinga, Spanish cedar, or cocobolo.  I pretty much use any 3/16" or 1/4" scrap wood I have available. If I plan to use granite powder or colored epoxy for the image, I often use oak for the back. I use a small paint brush to carefully apply the glue and make sure none has squeezed out into the image. I use a toothpick to clean up any excess glue. I clamp the two layers together for about 30 minutes.


I then cut the outside edge of the key chain and drill the hole for the hardware. I use an oscillating spindle sander to round over the bottom edge and smooth the curves.I apply a gel urethane with a small craft paint brush to all surfaces and edges of the key chain, being especially careful to make sure the entire interior cut edge is coated. The wood needs to be sealed completely or it will release bubbles into the epoxy as it is curing. Penetrating oil does not work to seal the wood. I then remove any excess urethane and let dry for at least three days.

Next, I fill the interior design with epoxy. When finished, the key chains have a smooth surface and won't catch on clothing or items and break the fragile design edges. I first place freezer paper on my work surface and then a plastic lighting grid from a home improvement store. If any epoxy drips over the edge, the grid makes it easier to remove the key chain when cured. I carefully follow all the instructions for the epoxy, carefully timing both mixing stages. I use plastic medicine cups to measure, plastic bathroom cups to mix in, and skinny wood sticks to stir. I also use the bathroom cups to divide up the epoxy to add different colorants.


If I am using granite powder, I add enough to get a consistency similar to oatmeal. The particles in the powder want to settle out to the bottom, I have found that I need to add a lot to counteract this. I make sure I have overfilled the image. It will shrink a little as it cures, and some will be absorbed into any wood that was not thoroughly sealed. There will be bubbles in the epoxy when it is first mixed, but they will rise to the surface and pop on their own. Occasionally bubbles will get caught in narrow cuts, but they can be popped or removed with a straight pin. A scrapbook embossing tool can also carefully be used over the epoxy to pop bubbles.


I then cover the poured epoxy with upturned plastic storage boxes as soon as possible to prevent dust and pet hair from settling into the epoxy and allow to cure for about 4 to 7 days. The longer they cure, the harder the epoxy gets, which helps keep it from getting deeply scratched during the next sanding step.


After the epoxy is cured, I use the oscillating spindle sander to remove any excess epoxy on the top surface and any that has dripped onto the sides. Turning the key chain often helps keep the top flat.  When all the excess epoxy is removed, I round over the top edge and finish sand by hand with increasing fine sandpaper. I try to remove any obvious scratches in the epoxy, but it is impossible to remove all traces of scratches on the epoxy. The sanded epoxy also will have a matte finish instead of the shiny finish it had when poured.


Finally, I use dusting cloths such as Swiffer or Pledge to remove all the sanding dust and finish with two coats of urethane gel, wiping off the excess and allowing a few days between coats.


Steve recommended using Inlace or polymer clay for the interior design. Inlace is very expensive and difficult to find and I didn't really like the results I got from using polymer clay (the dolphin below), so I decided to use a casting epoxy. I use Easy Cast which is low odor and mixed in equal proportions. I also use their faux granite powders. I also tried using their colorants, but the color absorbed into the wood and left stains on the surface. If I want a solid color, I found that scrapbooking pigment powders such as Pearl Ex work, although unpredictable patterns sometimes develop during curing as with the tropical fish.


The guitar is filled with Pearl Ex pigment powder mixed with a darker blue embossing powder to give it a little texture. Embossing powder will not dissolve in the epoxy, so it can't be used for solid color.


The shark uses black quartz granite powder and the sea turtle is Appalachian green granite powder.


Most of the dogs, like the lab below, use clear epoxy and contrasting wood backgrounds which show through the epoxy.

Thursday, July 28, 2011

Reflecting on a Year on Etsy

A year ago yesterday I opened my shop on Etsy. Like many people who handcraft, this is something I had dreamed of for many years. I started with several crochet patterns that I had designed over a few months for a contest on the Instructables website. I started designing crocheted animals because I was finding it difficult to find pattern creators who would allow sales of the finished item. I don't have young children or relatives and I couldn't justify the cost of the patterns without being able to market the finished products. I decided I would allow unrestricted sales of items from my patterns provided that I would be credited as the designer and the items would not be mass produced. As soon as I listed the patterns, I had sales and I continued to renew over the weekend. Crochet patterns are still my biggest sellers. Even though I only have 8 designs, they have accounted for 89 of my 173 sales in my first year. The opossum is by far the favorite, although it is not my personal favorite:


I strive for realism, and he turned out more cute than realistic. The opossum sample also sold, even before he was completed, to a woman who saw him in progress at the Jubilee bear show in Kansas City. I have joint pain which affects my wrists and fingers and can make crocheting difficult, so I have not been working on any new patterns recently. I have lots of ideas for patterns and will hopefully be able to design more in the future.


Over the course of the year, I added some of my beaded jewelry to my shop. Jewelry design is by far my favorite hobby, but it is one of the most difficult categories to sell on Etsy because of the sheer volume of items and sellers. Newly listed items are quickly buried under pages of newer listings. Still, I have sold 6 of my designs, and also 2 dichroic glass pendants. My rubber stamped recycled tile pendants have done a little better (18 sales). I really enjoy making these, but have a lot of trouble getting the tiles since they are not always available and I have no control over colors.


I have been scroll sawing for 12 years and discovered Steve Good's Scrollsaw Workshop, which is one of the best scroll saw resources on the web. He allows sales of items from his patterns and many of the items in my shop are either his patterns or adapted from them. The key chains have been popular (33 sales), especially the ones of various dog breeds. I have also used the dog silhouettes for wood pendants.


I can't draw at all, so the wood key chains and pendants use elements of patterns which allow sales of finished products or are from public domain clipart. I try to be very careful to respect copyright law and also to credit designers of the patterns I use. The aardvark pendant was from OpenClipArt.:


I just started adding the wood pendants recently and they have been doing well (8 sales). The hardest part is getting the hole for the bail drilled in the correct location. I have a few I can't sell because they tilt to either side.

I also recently began making wood toys after I discovered John and Cynthia Lewman's Toymaker Press patterns. These are adorable, easy to make, high quality plans designed for the scroll saw. John saw the toys I had made from his patterns on Etsy and has been very supportive. He has featured me on his blog and his email Toy Stories. I have only sold 6 toys so far, but am hopeful they will be popular over the Christmas shopping season.


Over the past year, I have been contacted several times about custom orders or designs. One of the most unusual request was this pair of earrings cut from matboard. I have cut simple shapes from matboard to use for cards or scrapbooking, but this was my first piece of jewelry. The matboard I use  is recycled from scraps from a framing shop or Leftovers.


The best part of selling on Etsy has been the people I have met, both my customers and the other sellers. I have been fortunate to participate on a couple of Teams and everyone is very supportive and encouraging. I am especially grateful to Team Discovery, whose members have taught me a great deal about what it takes to be successful. I was not aware of how much time and effort it would take and how much networking is required. I am not a social person by nature and still struggle with all the social networking aspects. Still, I feel the past year has been a good start and hope I can continue to grow my shop and sales.